Posts Tagged ‘Made-By-Bacteria Forums’

One of the fastest projects I’ve been able to design, cut, assemble and test, the PS2 Advance is a simple but cool looking mod that goes along the lines of the original Cross Plane and makes use of its Breakout Box. Not a portable, but just a dedicated controller with Audio/Video capabilities.

Basically this mod was done as a side project as I was waiting on parts for the N64 project as well as the Cross Plane commission that I’ve taken on. Honestly though, I did this just because I wanted to use up a bunch of loose parts I had laying around the shop and since I’d never done anything with a Sony product outside of the control pak for the Cross Plane, I thought this would be fun.

The build consisted of two AG-85’s from Poly Case. Though originally I planned to use the case as it was, I found that it was very thick and wasn’t all that comfortable to hold. So then I got to wondering, what if I could use two back halves of the case? Well, giving that a shot I found that yes, it would work and felt very comfortable and natural in the process.

A main issue I had to fix though was the top panel that holds the two halves together. I ended up having to mill out my top and I was extremely pleased with how well that fit together. Also, because the back halves were meant to have the screws just slide in and screw into the front half, I had to ditch the screws that came with it mill out a hex slot for an Acorn nut to fit into. This allowed me to use 4 #6-32 x 1.25″ pan head screws painted black to hold the two halves together nice and secure.

As mentioned before, this was just a mod made of parts I already had, with the exception of:

RDC’s PS2miniDS2 Controller Board
KONICA MINOLTA DIGITAL CAMERA

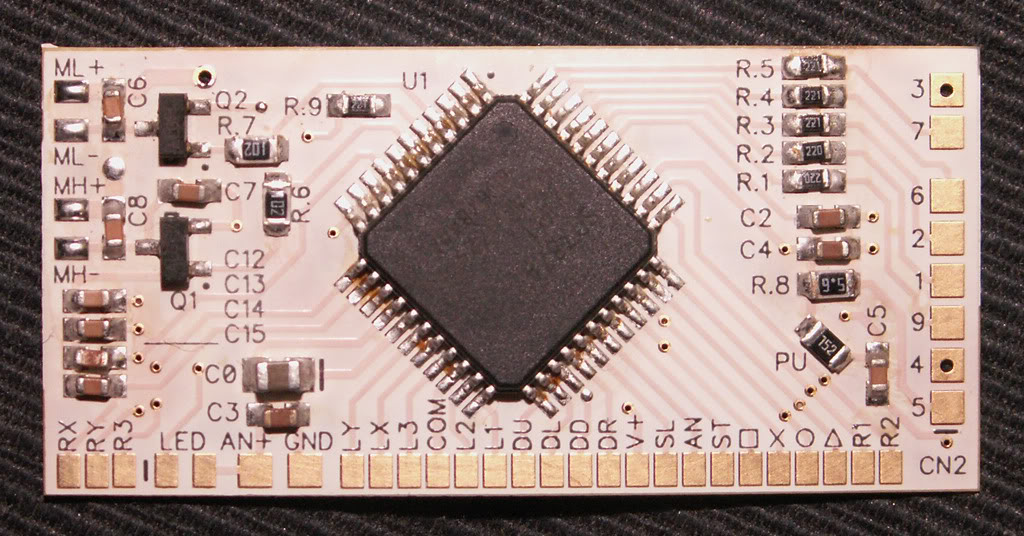
Which is a freaking amazing piece of modding technology. The controller board is an alternative to using the real PS2 controller board, which is beneficial as a space saver and is designed for modding situations. Because most controller layouts don’t work for 90% of the modding projects we do, we always end up just running wires to the controller and use a variety of tact switches or custom PCBs anyway, so stripping away all that from the board and replacing them with test points saves a great deal of space. The only downside is the boards need to populated with the original controller components, which can be a bit tricky as it involves hot air rework and a fair amount of time to swap them over correctly.

All in all though, I’m very happy with how this came out and in such a short amount of time. Now that this is cleared off my work bench, I can concentrate on the N64 as well as the Cross Plane commission I took on and am waiting on parts for.

The whole unemployed thing sucks like you wouldn’t believe, but if I look at it on the bright side, it has given me a chance to pursue what I love at the same time while I wait.

Anyway, here is a video of the build process and a demo of the handheld in action. Hope you enjoy!

Word seems to have gotten out about the work I’ve been doing for other modders and in the last week alone I’ve taken on over 5 new case jobs for 3 different modders doing console commissions for other people as well. Now this doesn’t sound like a lot but compared to previous numbers of 1 or 2 jobs a month, 5 in a week is quite the increase.

The job above is a simple case cut from a Poly Case SL-68 for MBB forum member [Gman] who runs a small operation known a [Gman Modz]. He’s been doing some pretty impressive work as of late and I’m glad to be helping him out with some of his projects. This one was a run of 3 cases, all cut the same and are for Portable Nintendo 64’s. Given the size of these cases, it will be quite impressive to see these completed.

That said, I am also in the process of doing a full vacuumed-formed custom Portable Game Cube casing which will have a surprising similarity to another console on the market today. Stay tuned for that one!

Made quite a bit of progress over the past few days. Though I ran into a nasty snag yesterday trying to get the PC to even turn on. Turned out the On/Off header that the power button connected to was color coded incorrectly. So instead of hooking up the switch, I was plugging in the LED instead which just shorted out the power supply!

So after 2.5hrs of screwing around with that, I was able to start making some real progress. With that said, the list of accomplishments go as follows:

  • PS1 screen mounted, wired and tested. Composite for now.
  • All buttons, LEDs and Spindle control installed.
  • Face plate rough mounted.
  • All wires extended and plugged in.
  • ATI X1300 128MB graphics card installed.

A full update and pics can be seen on MBB as always.

Progress still needing to be made:

  • Finish wiring up the CNC Controller to the face plate
  • Cut plastic panels and mount back hardware (i.e. spindle and stepper motor jacks)
  • Prime and paint the main box
  • Label buttons and add decals

I’m hoping by the end of Saturday I’ll have much more complete, at least to the point I can get my router running again as I have a few jobs that I need to get started on, including another case for a ShockSlayer commission. If you didn’t see his previous video of the last case I sent him, have a look. Quite comical in its approach and not the format I was expecting, but fun to watch regardless!


Finished off a nice little commission from our old pal Shock Slayer. He sent me the .dxf files for a design he worked on and I turned it into a machinable file. This came out quite well with the exception of the back slats where on the last couple of cuts, the clamp I had holding the case down failed and that screwed up a couple of the slats before I could fix it.  More pics can be seen HERE.

Anyway, overall I think it looks pretty decent and I’ll be doing a couple more for him in the near future!

In other news, I’ve got some pretty big things I’ve been working on with fellow MBB member RDC. The guy is circuit board genius and his help has proven to be what I think will make these ideas of mine take shape. More to come on that later once we get closer a working prototype or two.

It’s been nearly a month since this project has had anything done to it other than moving it from one place to another in my shop as I updated that. Now that that project is nearly complete, I decided it was testing time for the nearly completed controller.  All in all, I like very much how this came out utilizing my first attempts at homemade circuit boards and CNC machining.

Though I did have to make a few adjustments with the homemade controller board, as in ripping it out and putting the official SNES controller back into it, I still can’t complain much. I will be hopefully starting the second controller shortly and will make every attempt to get this finished before the holidays! This will be for sale too and there will still be a bit of time to get it out for Christmas so if you are looking for that special gift for the retro geek in your family, send me a message!

As for now, enjoy the video and check out the build logs on the MBB forums! More info there as always!

Though I agree this does in fact look quite like a chaotic mess of wires and breadboard, it hides the simplicity of the whole project very well. But for a project that’s already been done, there are many unique “firsts” for me this time around. This is the first time that I’ve ever used custom PCB’s in a project, much less boards I’ve cut myself. Along those lines this is the first project I’ve cut the vacuum mold out via CNC and made all the cuts and engraving via the same method. This is the first project I’ve ever used CAD programs on for that same reason. Also this is the first time I’ve ever tried to make my own controller using nothing but micro chips and resistors.

With so many firsts though, naturally come many unknowns. Where this will all end up is a mystery but I’m sure by keeping to the basic principles of process, I’ll be able to make this work the way I need it too. Anyway, just a quick update as to where I finished off for the weekend and where I’ll be picking up next week. Been a busy day today as far as traffic is concerned and I want to thank all of you who have taken the time to check out my work.

Remember, please subscribe to the blog (in the sidebar), my You Tube channel (in the sidebar too) or become a member over at MBB so you can keep up with all the new and exciting developments from all our members!