So today one of my favorite tech blogs “Hack-A-Day” posted an article of a really cool hardware gaming mod from Nolan S, otherwise know as [Fibbef]. This mod took a Sega Dreamcast and put a screen and audio speakers in the controller using a USB cable and custom break out box for the A/V…wait…that sounds surprisingly familiar.
The mod is excellent, the quality and the effort speak for themselves with this one, but the coolest part is that it’s directly related one of my older projects that did the exact same thing. The SNES-001 Advance 2 was my 2nd attempt at off TV gaming which eventually lead to the creation of the Cross Plane. The Advance used a breakout box to split the signals to the TV and the controllers so up to 3 video sources could be mirrored at once.
It’s just a really cool feeling to have that people are genuinely interested enough in some of my work to try it out for themselves, improve upon it and make it their own. I’m just excited that it’s making a bit of an impact with other modder’s that are also getting noticed for their work.
Hey Everyone! Sorry it’s been such a long time between posts. I’ve been up to my ears in projects as well as finally getting a new job that I should hopefully start at the end of the month!
Anyway, here’s just a quick example of what I’ve been up to, still plucking away at this Cross Plane commission I took on for an enthusiastic KickStarter backer that really just had to have one of these! It’s flattering and I do appreciate the gesture, but man these things are a lot of work! hehe. Not that I’m complaining as this is by far the prettiest work I’ve done to date as I’ve been able to utilize a lot of the skills I learned about 3D printing, CNC machining, case finishing and wireless/HDMI technology. But again, this particular unit is trying to be better in every way to the prototype and in doing so, has made changes that have needed to be tested and troubleshot.
HDMI is a sensitive little bitch that will cause headaches for the simplest reasons. However, these headaches will be totally worth it once the final product is functional.
Still, have quite a bit of work to do on this, the next process being the most time consuming part, the control paks. However, RDC helped me out with these last month so we can actually utilize them the way they were intended to be used back when we did the first prototype, and not the hack job we ended up with.
In any case, I’ll try to be a bit more on top of the postings, as well as looking into maybe bringing on another writer to Downing’s Basement Blog so the down time won’t be so boring and you can have something to read more than once a month! But anyway, I’ll be making more updates soon and hope you have a happy holiday next week!
One of the fastest projects I’ve been able to design, cut, assemble and test, the PS2 Advance is a simple but cool looking mod that goes along the lines of the original Cross Plane and makes use of its Breakout Box. Not a portable, but just a dedicated controller with Audio/Video capabilities.
Basically this mod was done as a side project as I was waiting on parts for the N64 project as well as the Cross Plane commission that I’ve taken on. Honestly though, I did this just because I wanted to use up a bunch of loose parts I had laying around the shop and since I’d never done anything with a Sony product outside of the control pak for the Cross Plane, I thought this would be fun.
The build consisted of two AG-85’s from Poly Case. Though originally I planned to use the case as it was, I found that it was very thick and wasn’t all that comfortable to hold. So then I got to wondering, what if I could use two back halves of the case? Well, giving that a shot I found that yes, it would work and felt very comfortable and natural in the process.
A main issue I had to fix though was the top panel that holds the two halves together. I ended up having to mill out my top and I was extremely pleased with how well that fit together. Also, because the back halves were meant to have the screws just slide in and screw into the front half, I had to ditch the screws that came with it mill out a hex slot for an Acorn nut to fit into. This allowed me to use 4 #6-32 x 1.25″ pan head screws painted black to hold the two halves together nice and secure.
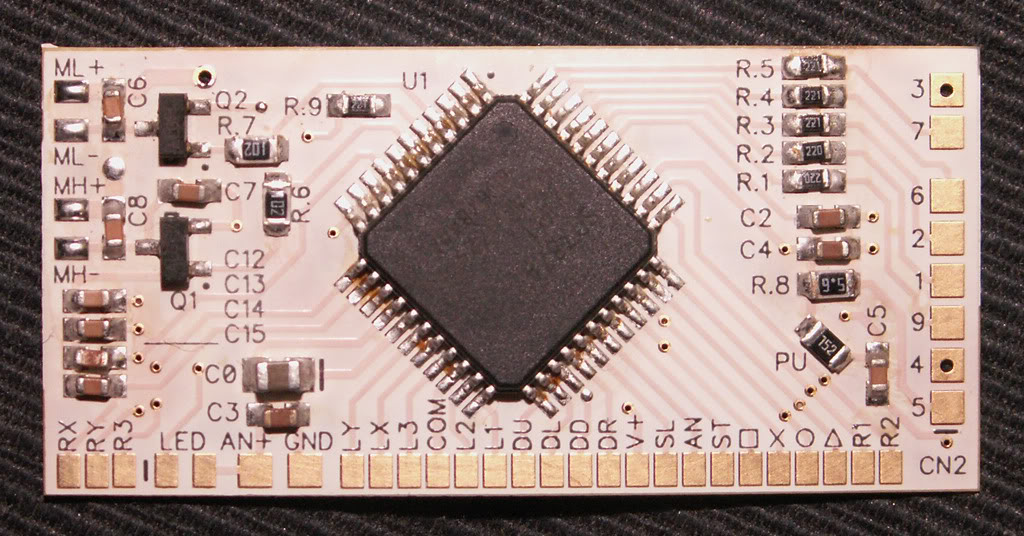
Which is a freaking amazing piece of modding technology. The controller board is an alternative to using the real PS2 controller board, which is beneficial as a space saver and is designed for modding situations. Because most controller layouts don’t work for 90% of the modding projects we do, we always end up just running wires to the controller and use a variety of tact switches or custom PCBs anyway, so stripping away all that from the board and replacing them with test points saves a great deal of space. The only downside is the boards need to populated with the original controller components, which can be a bit tricky as it involves hot air rework and a fair amount of time to swap them over correctly.
All in all though, I’m very happy with how this came out and in such a short amount of time. Now that this is cleared off my work bench, I can concentrate on the N64 as well as the Cross Plane commission I took on and am waiting on parts for.
The whole unemployed thing sucks like you wouldn’t believe, but if I look at it on the bright side, it has given me a chance to pursue what I love at the same time while I wait.
Anyway, here is a video of the build process and a demo of the handheld in action. Hope you enjoy!
On the heels of the Cross Plane KickStarter, I’ve been hard at work on a couple of side projects that of course have been taking up a lot of the down time that I’ve currently had while waiting for a few new job opportunities to come through.
The Nimbus III
My first portable N64 since 2011’s Nimbus II portable. This one is nice because it takes a lot of the design and 3D printing knowledge I received from doing the Cross Plane project. The casing is all 3D printed, complete with screw holes in the back and the face was CNC’d to compensate of the somewhat irregular holes the 3D printer can make. What’s unique about this build as well is that it will have the option for a wireless Audio/Video transmission to the TV. The back half of the casing just came in today so in the next couple of weeks I’ll start the painting and assembly process of the main unit.
Pictured below is the receiver unit for the N64 as well as the three play plug in so up to 4 players can be playing off the portable at any given time. Two USB ports on the bottom of the Nimbus allow for a quick connection to the receiver unit if multi-player is wanted. There is a work log on MBB started for this for more info.
The AG-85 PlayStation 2 A/V Controller
This was a side project to my side project as I had to wait a fair bit of time for the back half of the N64. But no worries, this was just as fun. This is essentially the same thing as my SNES-001 Advance II that I built last year, only of course, for PlayStation 2 and One. This is fully wired and connects to the same breakout box that the original Cross Plane (Cross Plane Retro) used. This is about 90% complete and I ran into some issue yesterday while testing so I’m not sure exactly when this is going to be finished. But all this was made up of parts I already had lying around. The only thing I had to buy were the speakers. Again though, this has been a fun project and I hope I can get it working before too long! Again, a build log for more info!
The Cross Plane: A One-Off Commission
That’s right, one more Cross Plane is being built at the moment for a customer who really really wanted one! This is going to be a far superior to our prototypes as I’ve made adjustments to both the casing and location of the HDMI receiver as well as to the internal circuit boards and just general location of things. It should be pretty cool to find out just “how” superior to the prototype it will be but just tackling some of the key issues of the CP’s first run, I think this is going to be leaps above the first version.
Right now I’m just waiting for parts to roll in and will be making a post on MBB for an actual work log. I think people will love to see what goes into making one of these and since we aren’t going to produce it, might as well show it off!
So stay tuned, there will be more to come in the future here very shortly and I’ll keep you updated as frequently as I can!
So we keep rolling on and these past few days have seen us gaining a little bit of traction in the world of unforgiving media responders. The haters have seemed to have settled down a bit at they become more informed and I’m constantly in the process of keeping the KickStarter updated and questions answered as fast as I can get to them. I’ve had over 500 emails in 3 days…I kinda feel like Jim Carey in “Bruce Almighty” when he’s answering prayers via email.
Anyway, I spent a good part of the morning getting some more professional pictures in place, which required me to make a cheap light box so I could get the shots I needed. They came out pretty well and most will be on the KickStarter page shortly. The pic up top is an example of what I’ve been doing today.
So, we’re gonna keep hitting this hard and will be pushing every second of every day to get to our goal. It’s up there, but I know there are enough people out there that want this to succeed and I hope it’ll get there in time!
Not more than a day and a half into our KickStarter campaign and we’re lighting up the tech blogs and creating a bit of a buzz about this! We’re up over $11,000 and are pacing for our goal, but it’s going to be an uphill battle before too long as the praise is almost out matched by the hate. haha.
But with any project such as this, going on a scale such as this, we knew this was going to be a reality. But, press is press, good or bad and this is what we need to get the word out there.
So anyway, if you haven’t checked out the KickStarter, be sure to do so at the pic below and I’ve also added the links to some of the major tech blogs and what they have to say about it.