Posts Tagged ‘Downing’

So after about 3 weeks of work, my 2nd N64 Portable Commission is now complete! As I’ve said several times before, this is the fastest build I’ve ever done and damn near the most well made and put together save the Cross Plane.

I’m very proud of this one as it was a medley of several different fabrication methods that all came together to make this what it became. On top of this, it also was a project that had a few “firsts” involved in it, the big one being that since the buyer of this is in the UK, I had to use a PAL system and take their difference in home power output into consideration. Though not a difficult hurdle, I had to find a PAL system with PAL games and also had to get a power converter to send to him so he can plug in the charger and the wall power.

System Specs:

PAL N64 Base System Trimmed w/Expansion Pak and Hardwired Memory Card
Custom 3D Printed and CNC cut casing
5″ 16:9 TFT Display with 4:3 Option
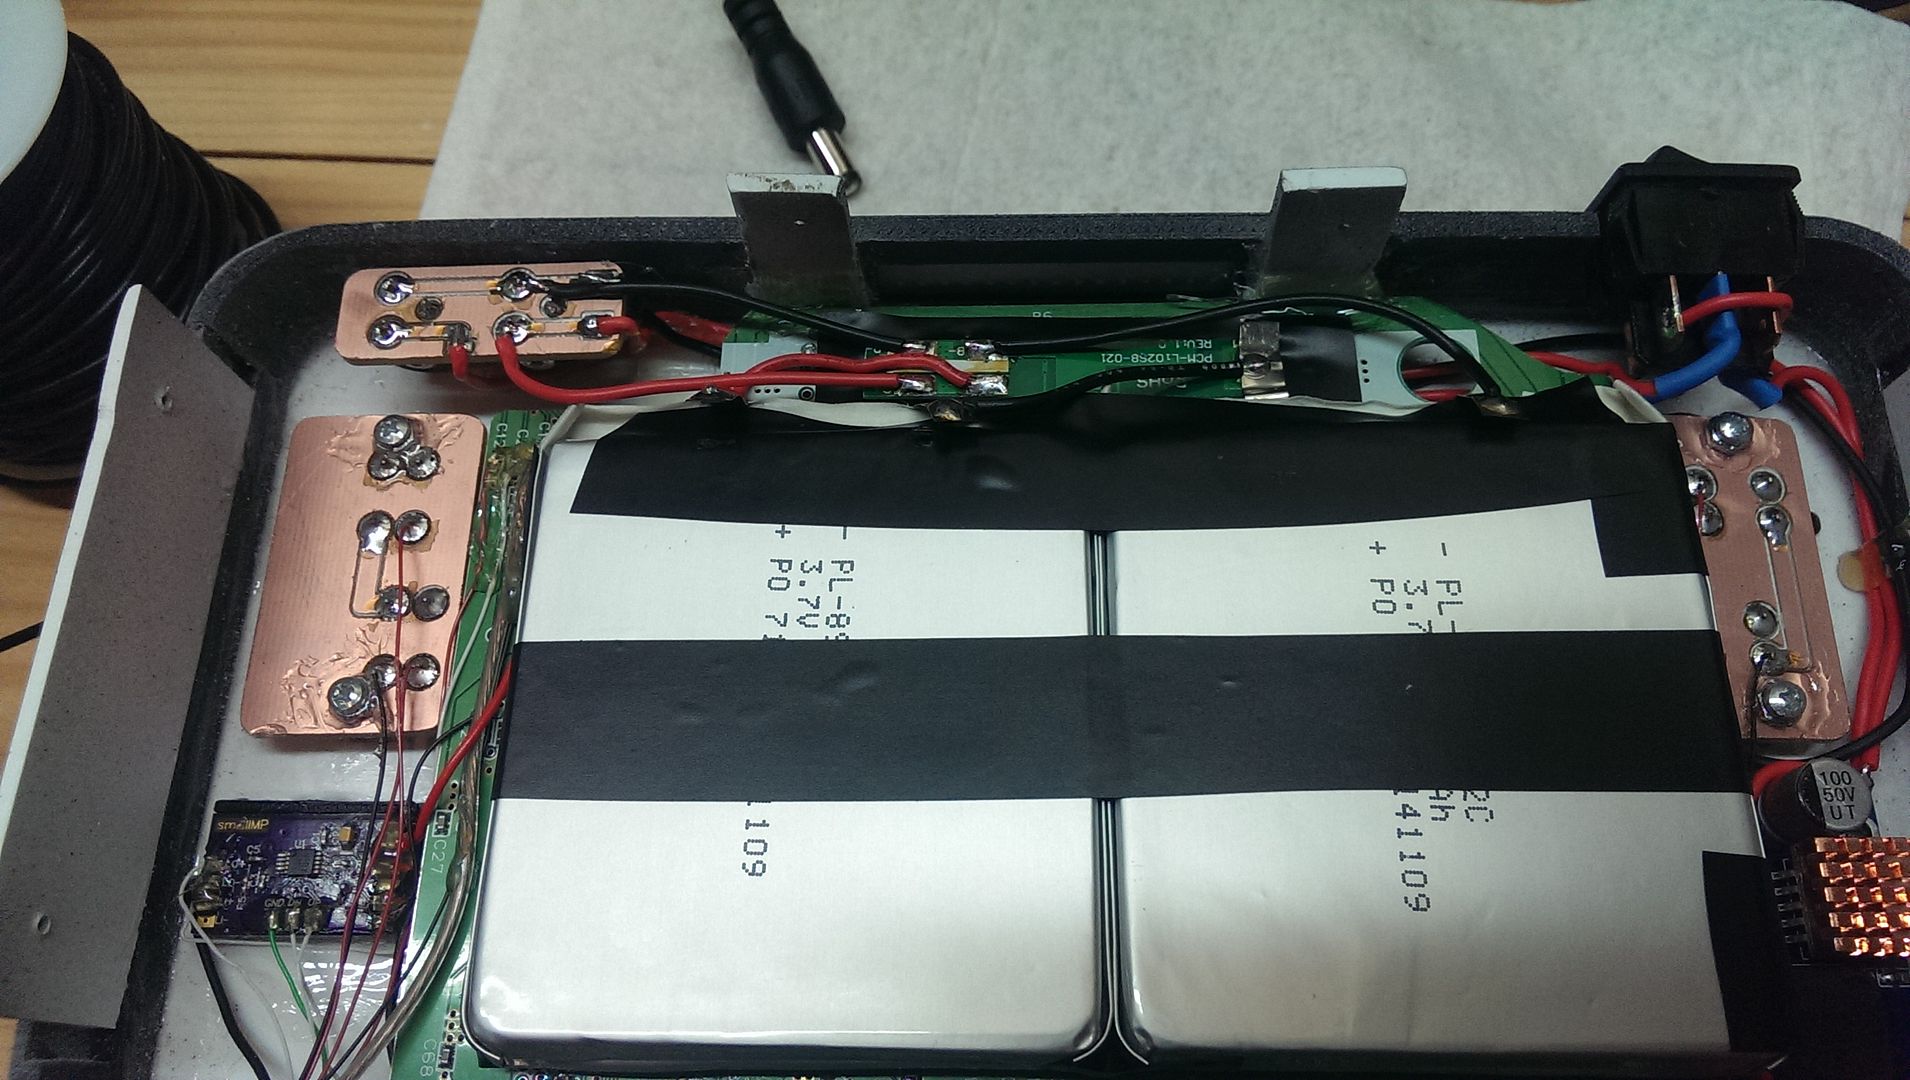
2 –  3.7v 5000mAh Li-Po Batteries in series for 7.4v output and approx 4hrs of battery life.
2 – 25mm Mylar Speakers & 3.5mm Headphone Jack w/manual switch
Custom Audio Amp by RDC
Battery & Wall Power with charge and play circuit
Standard N64 Button Config with Dual Z buttons
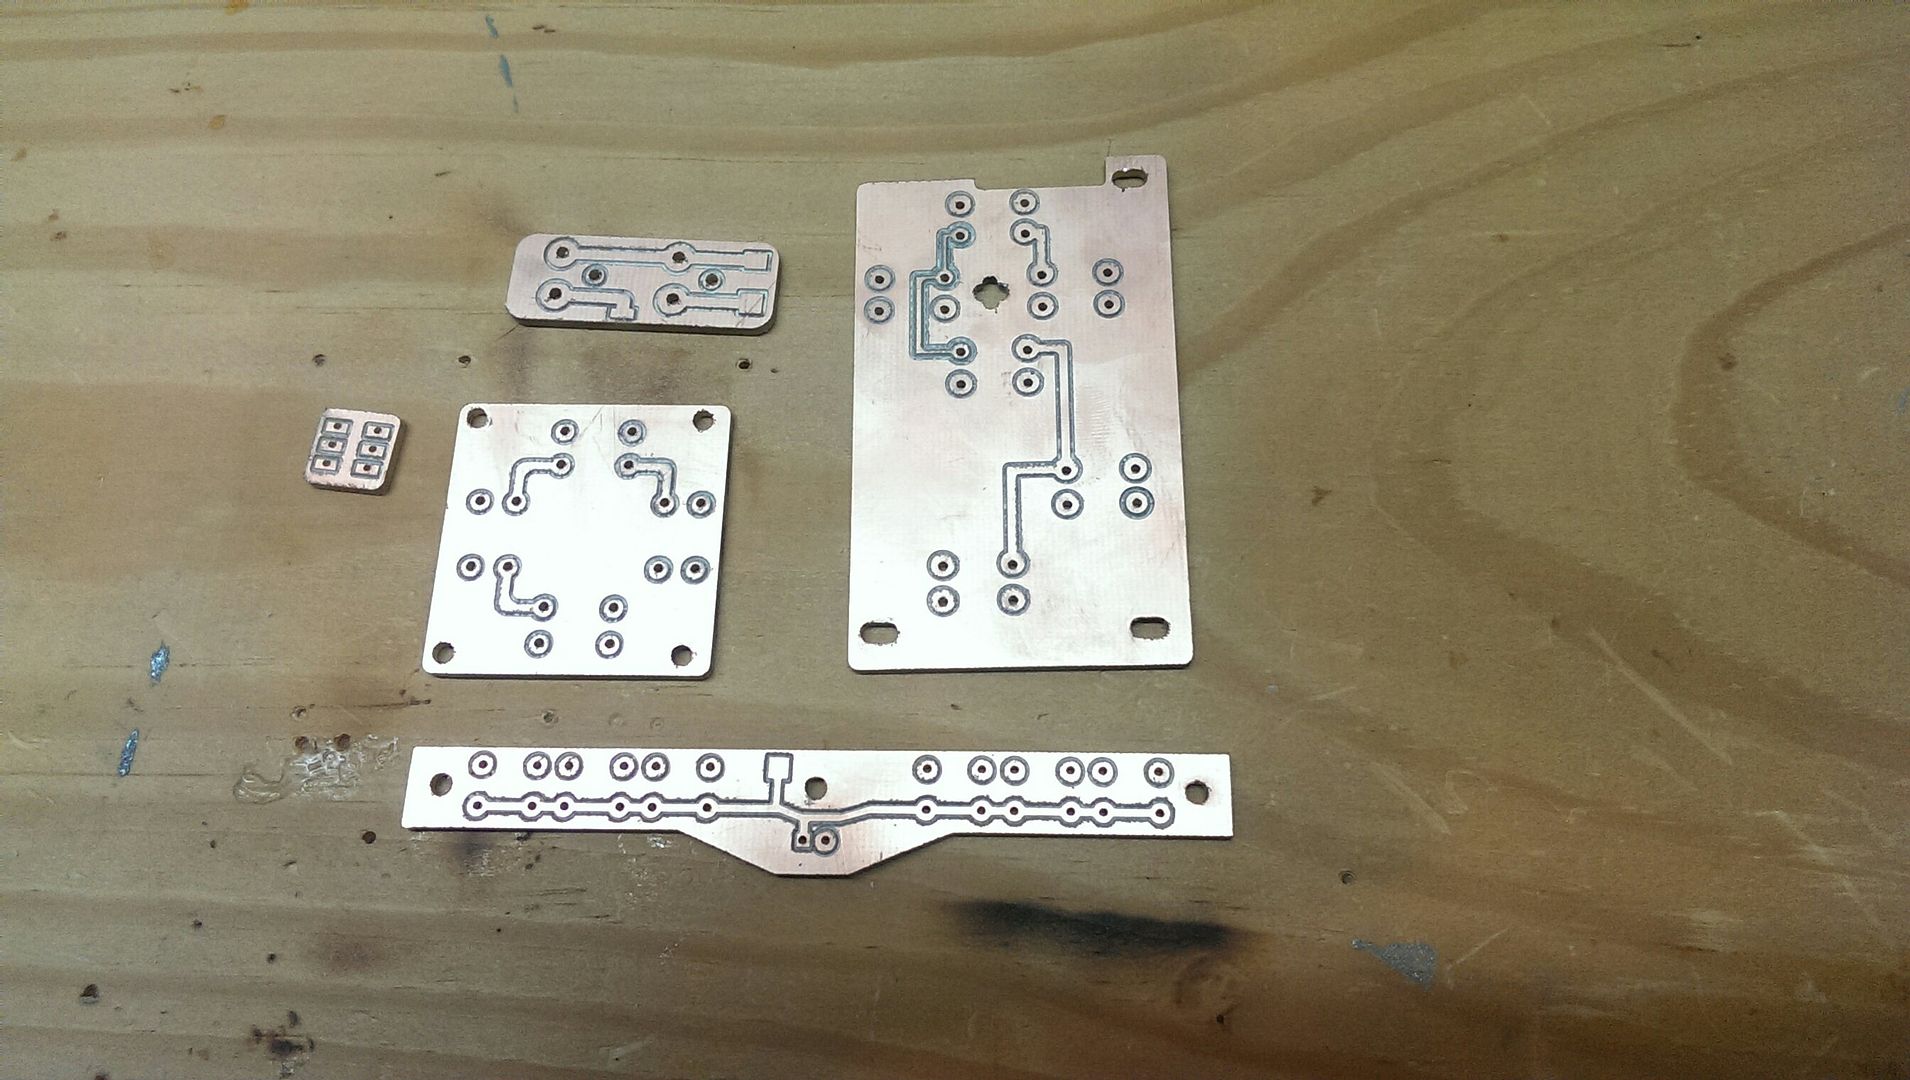
Custom Milled PCBs for the main buttons

As I said before, this system was built using several different fabrication methods, the two most prevalent being 3d Printing and CNC machining. This used the case making method I like to call “Plate & Bracket” which is a modular approach to case making that I’ve been implementing for the last few projects. Essentially this is just like it says, rather than printing a full case half with the edges and face all in one, I’ve found that printing edge brackets and using a separate face plate that is attached to them, the fail rate of the print drops dramatically and it adds a bit more flexibility to the build process.

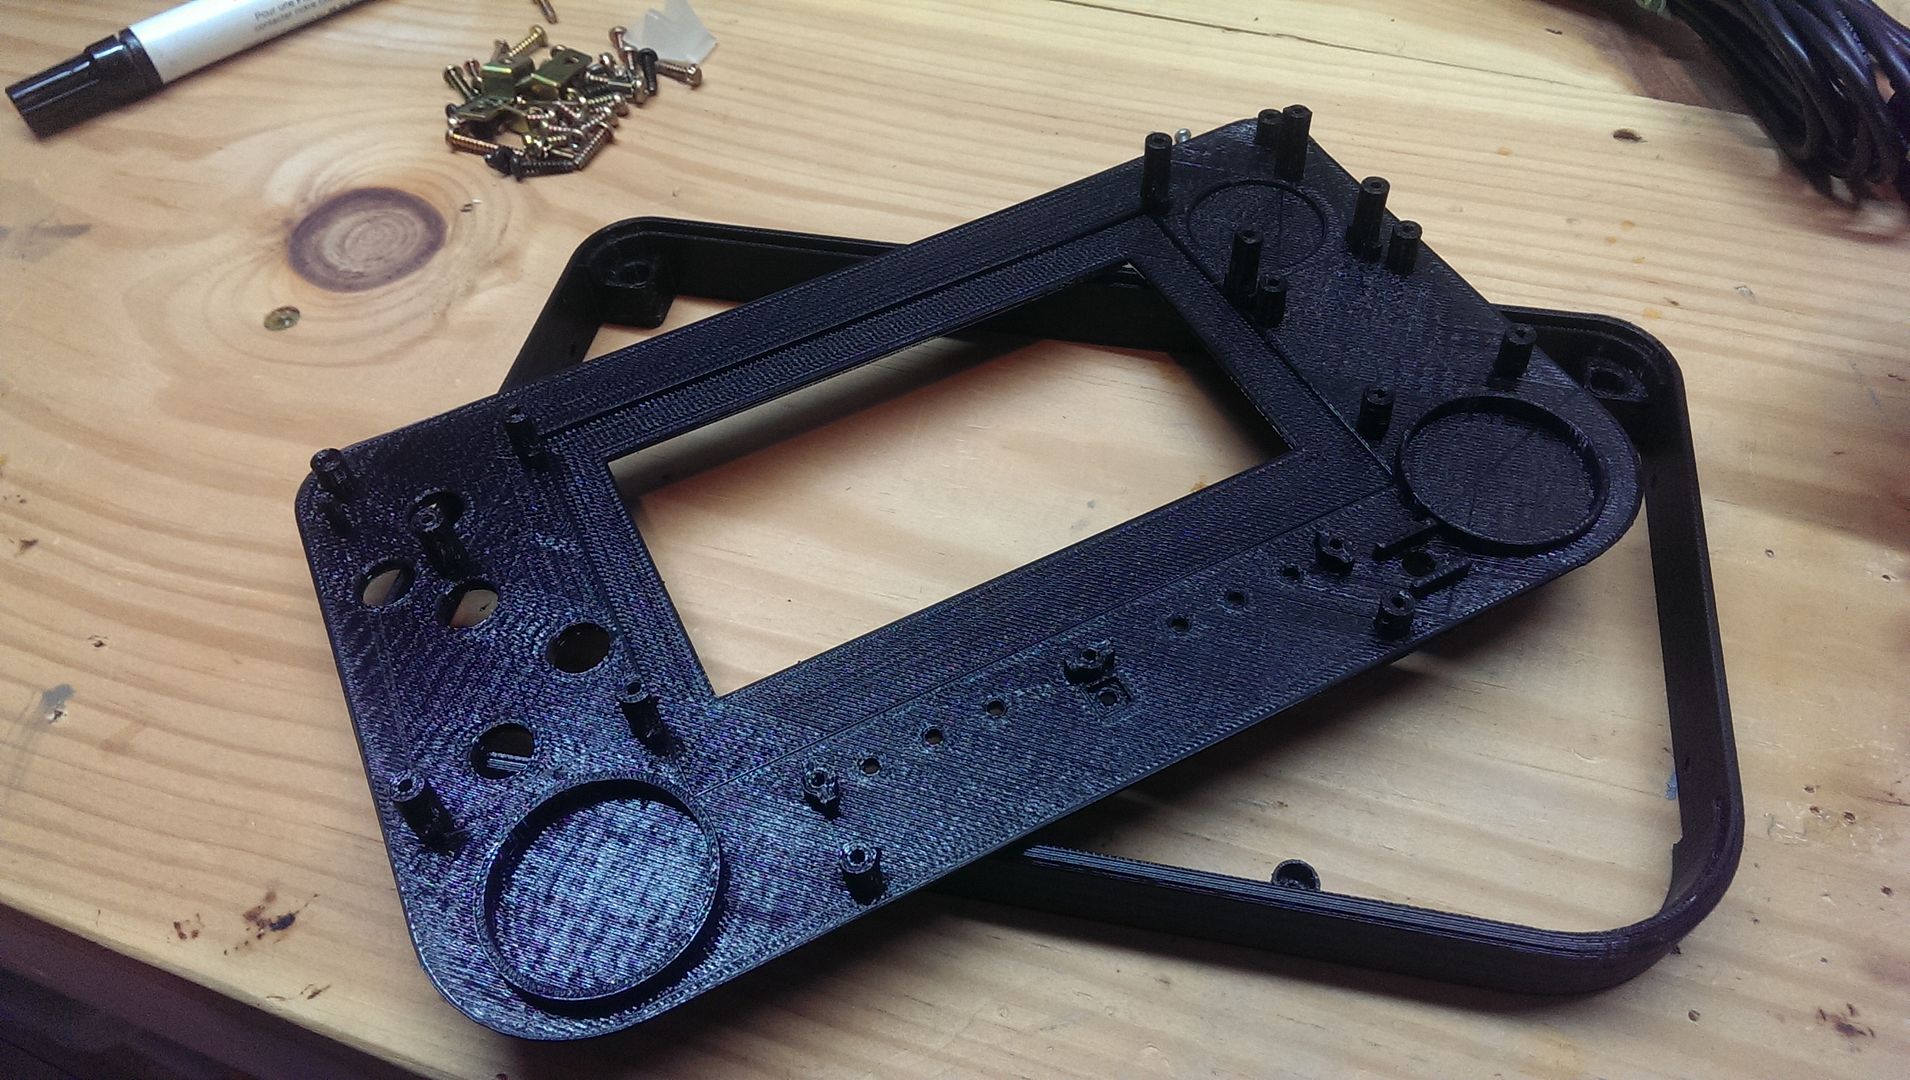
Another thing I’m fond of is using 3D Printing & CNC to give the best quality finishing of any openings in the 3D Printed Face Plates. Though it may be possible to get a perfect circle out of a 3D printer, I’ve yet to be able to master it. This is why when I print the face plates, they look a bit odd, but that’s because they are printed with the intention of being milled after the fact. The clean results just can’t be beat if it were left to 3D printing alone.

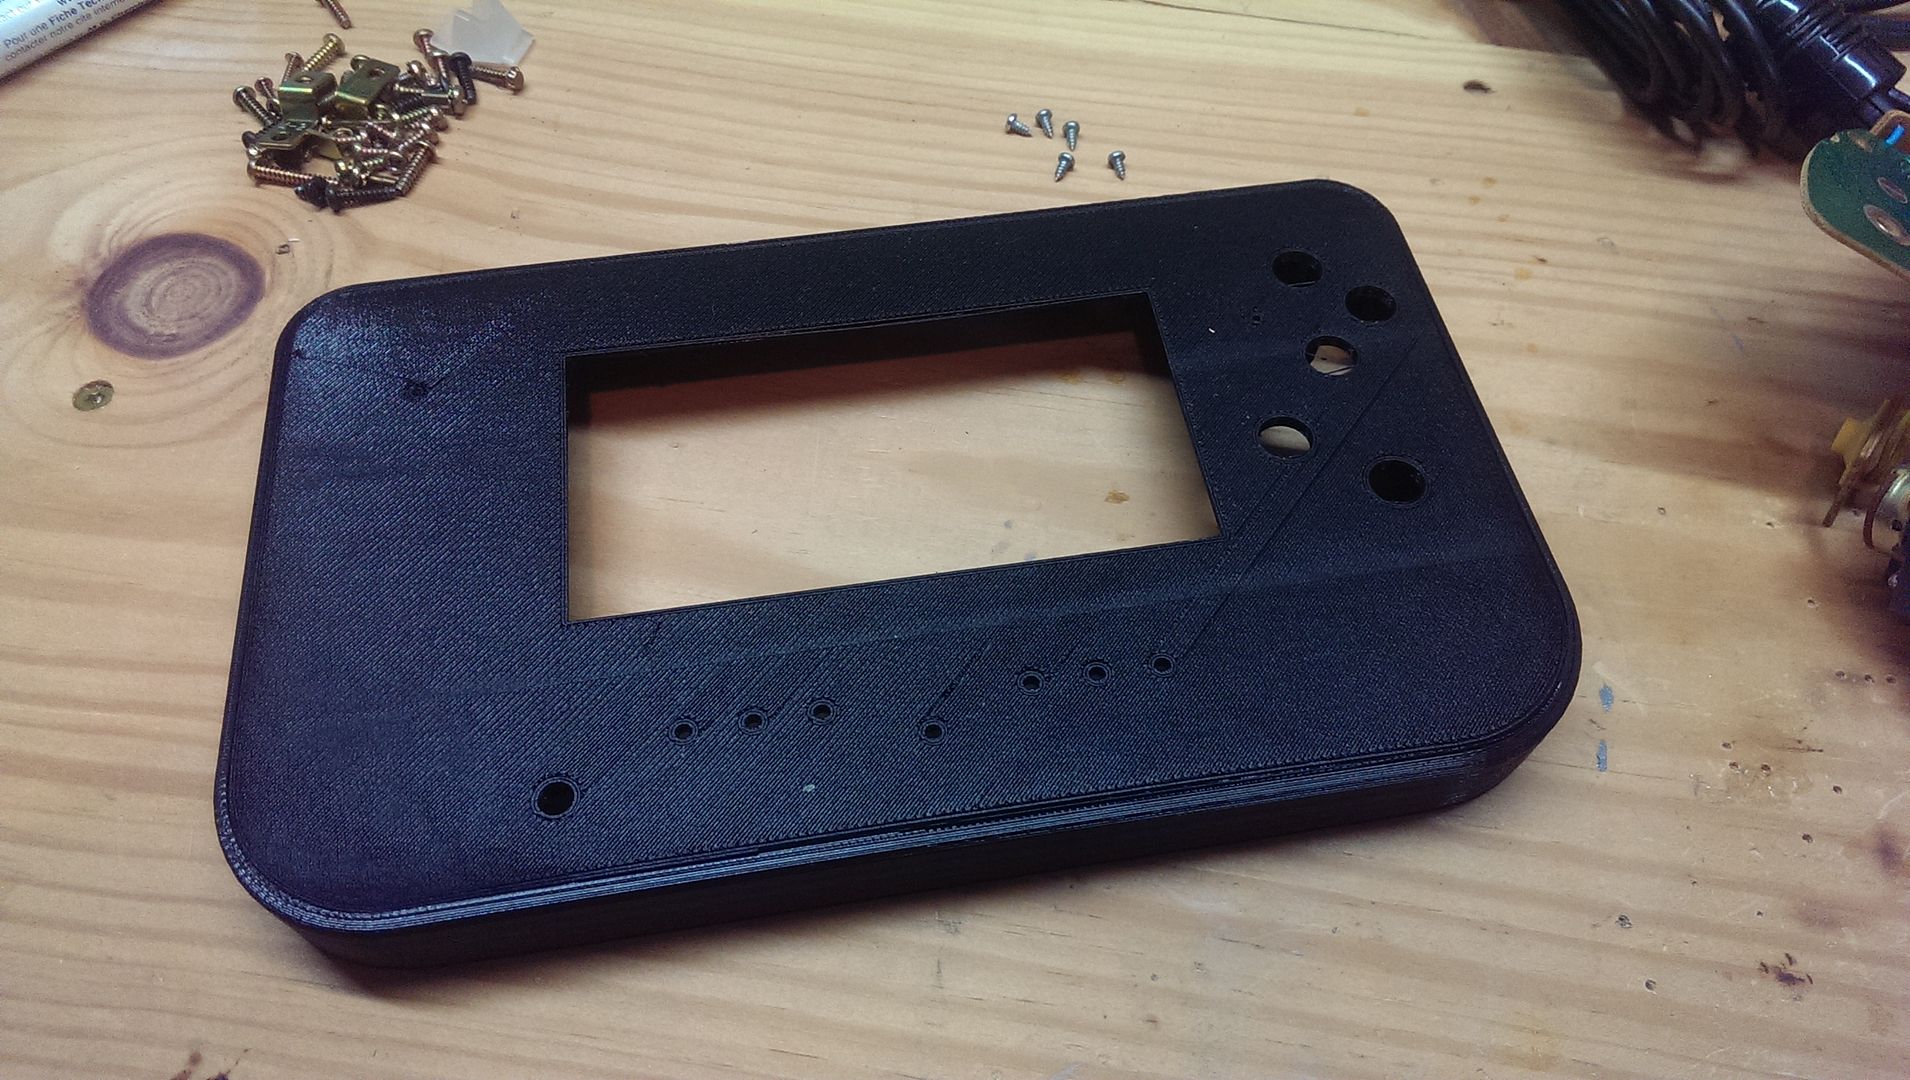
After Being Filled & Milled

I will say though, I’m not a fan of PLA’s milling properties. While it prints nice with fewer failures than ABS, when milling it has to be watched constantly because even with a single flute endmill, the melting point is so low and it cools so quick, it makes a gunky mess that can ruin a work piece and tool. In the future I’ll just be printing face plates with ABS.

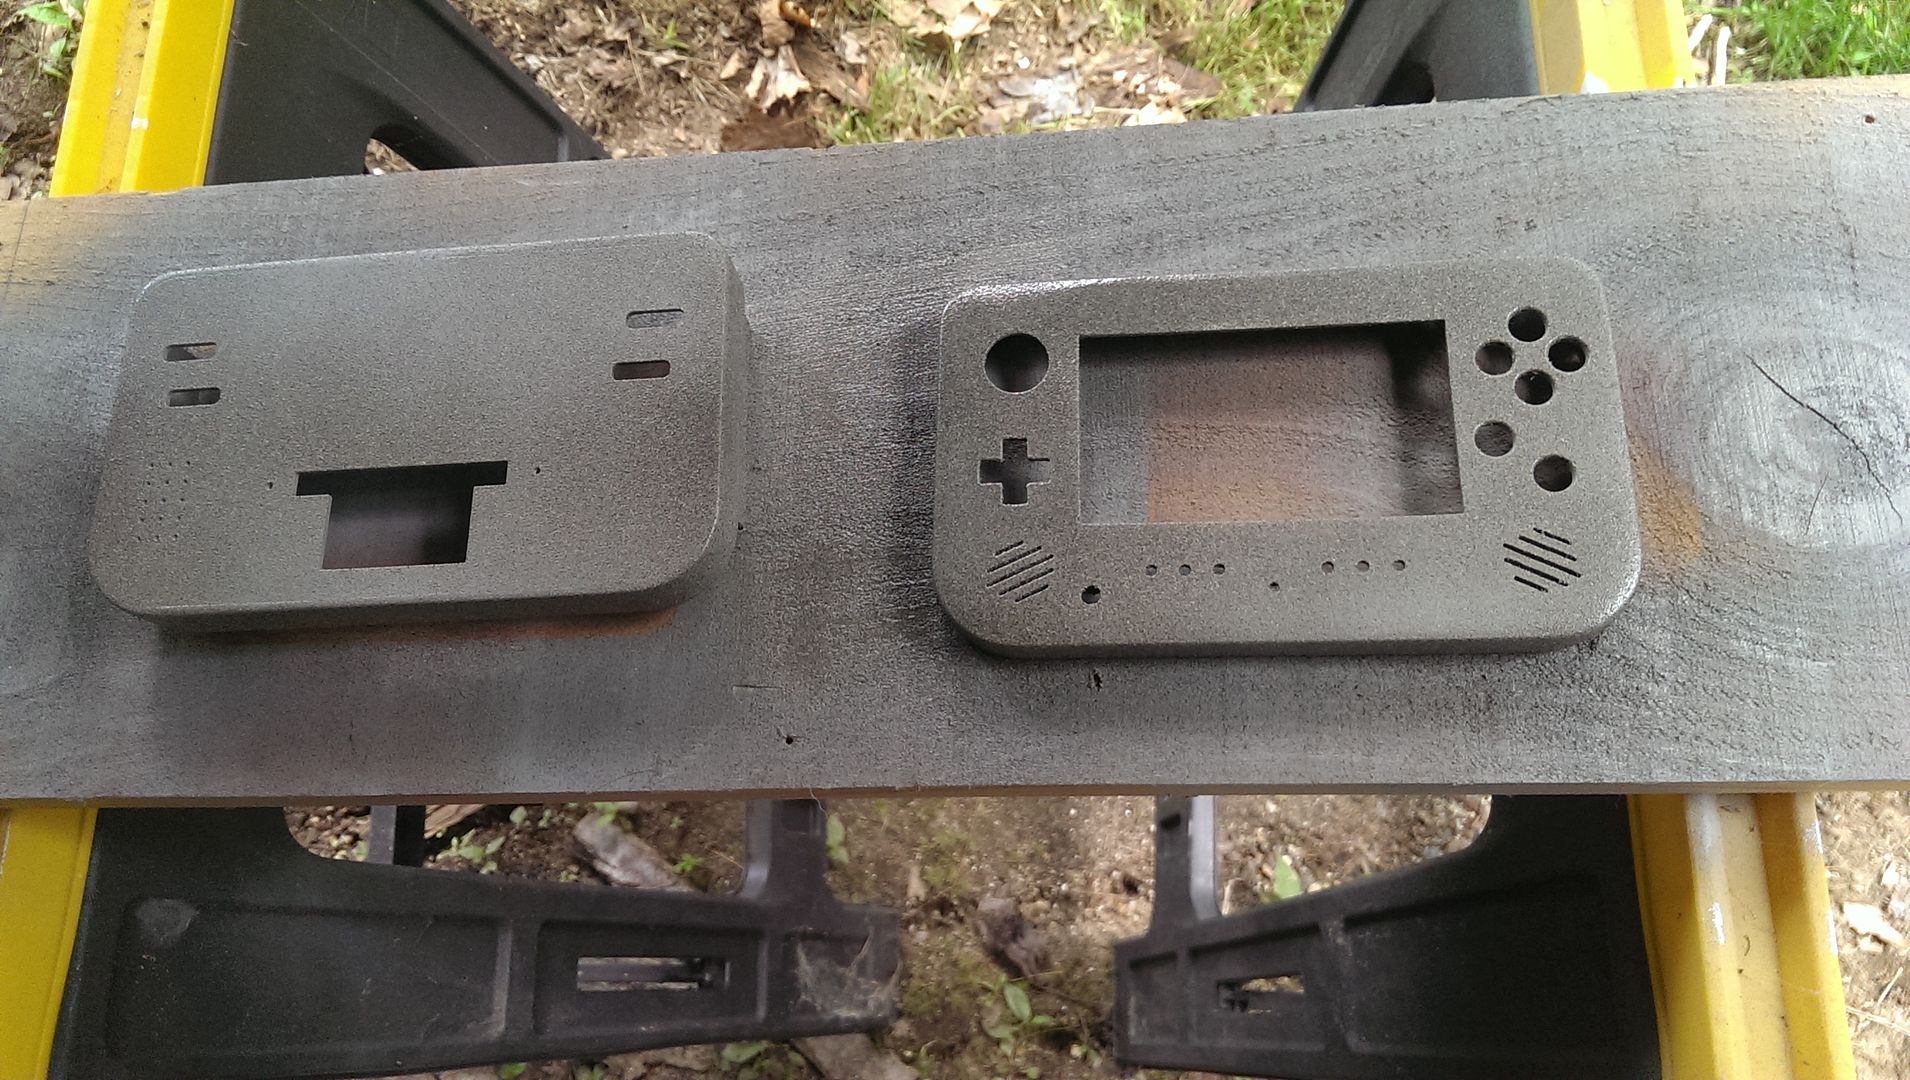
The case halves were then primed with a filler/sandable primer and finished off with a textured spray paint which I found covers the imperfections of 3D printing quite well.

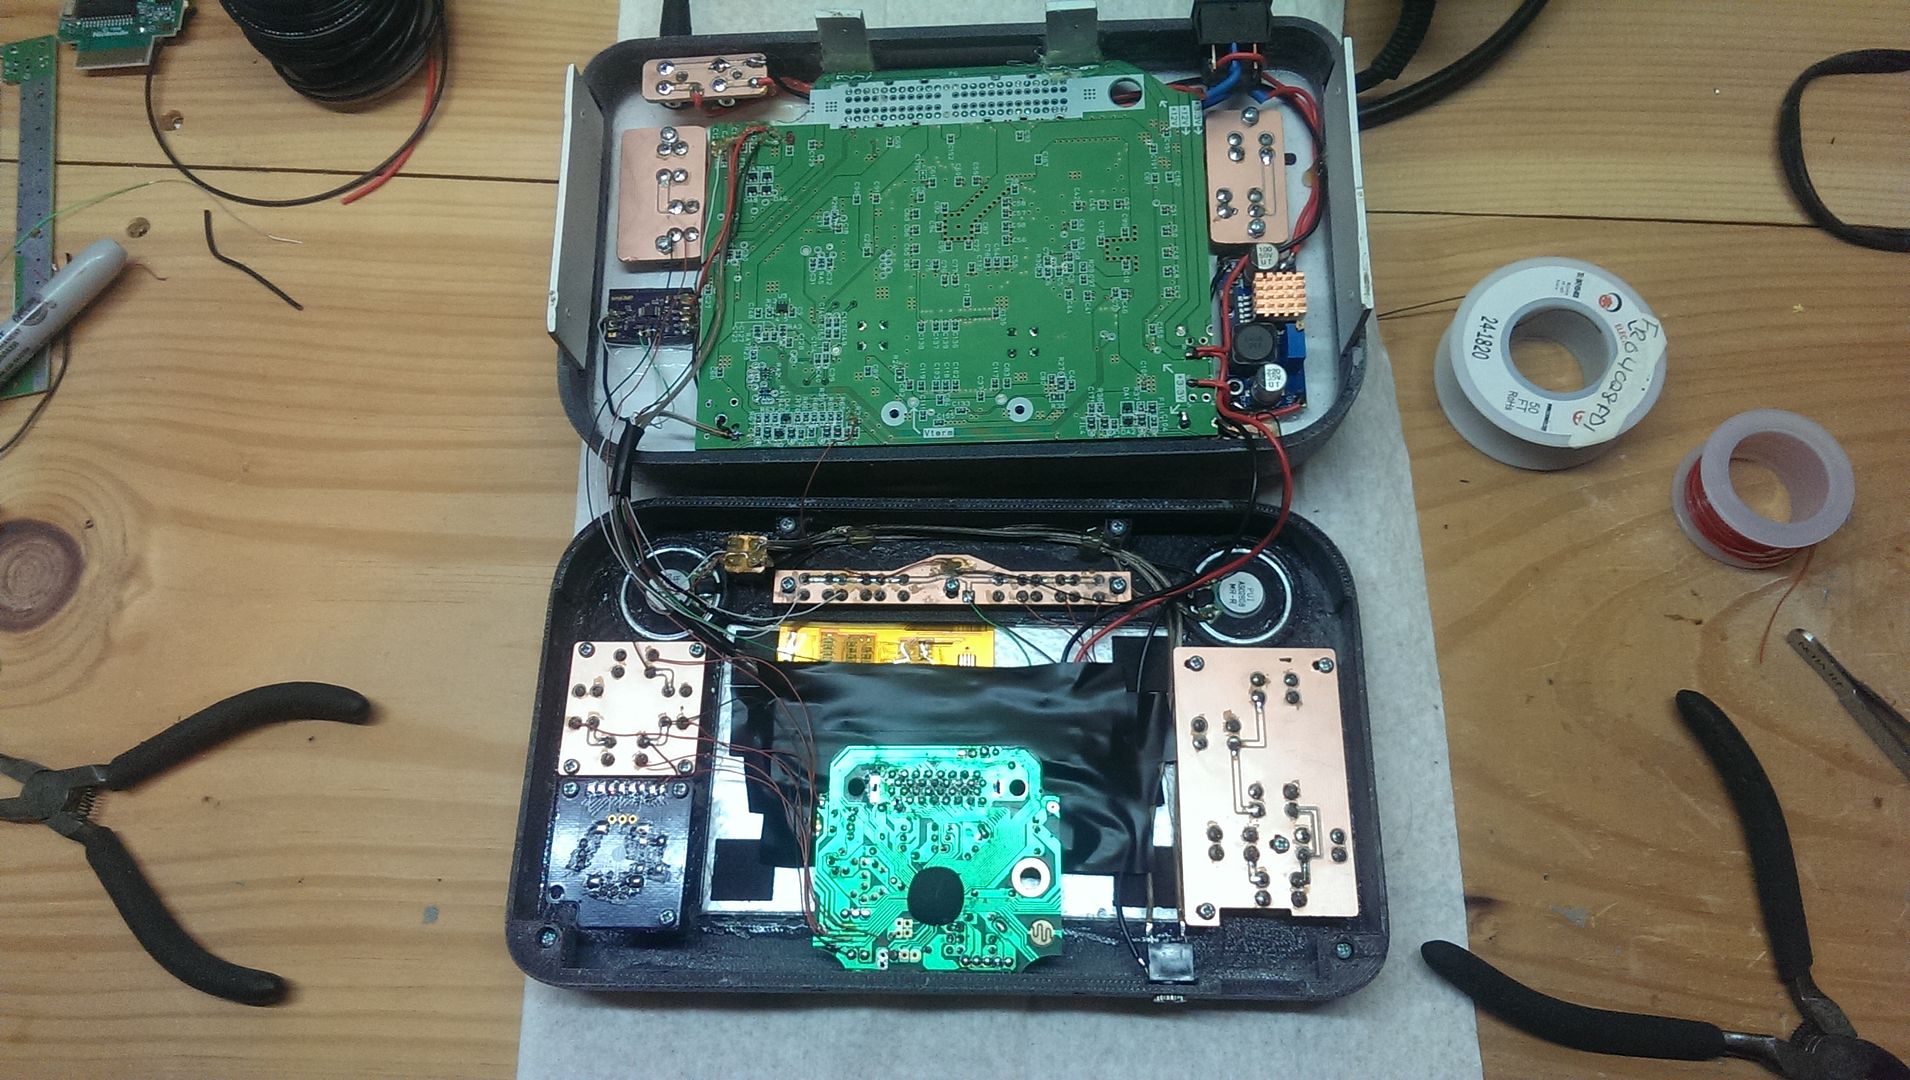
I did a few extra steps on this one to make sure the quality was where it needed to be which included milling my own PCBs. This added a great deal of strength to the system but also reduced the number of ground wires I was going to need to use freeing up a little bit of space. I had to modify that tact board for the screen though as all those on a single ground didn’t work so hot. I had on button that when I pressed it, the LED would turn on…yeah, something wasn’t right there. hehe

The layout on the inside because of this was very clean for a homebrew project and hopefully sturdy enough that it will not have to come back! This pic doesn’t show the batteries installed but they sat right on top of the N64.

Batteries wired up with protection circuit.

Soooo, yeah, this is my latest commission and after some more play testing to make sure it holds up I’ll be shipping it across the pond and be moving on to my next project. I’ve got several started and almost completed projects in the wings that I look forward to getting back to so stay tuned for that!


Northwood-N64p-Full Body Assembly

Yup, no sooner did I finish of my first portable N64 commission and ship it off did another come down the pipeline! Never have I had two such similar projects happen so close in time frame and it’s yielding some very cool improvements.

Essentially this is a duplicate of the N64p I finished off last month, but taking everything I learned from the first version and perfecting it the second time around. There are a few key differences in this one though that required a bit of extra design work, but it will be well worth the effort in the final project.

There are two big differences with this one. First, the screen is a completely different model than the other version. This is a wide screen 16:9 default ratio, however it does have an option to be 4:3 if the user wishes. I decided to go with for a few reasons, but the main reasons were picture quality and size. In my opinion, this screen is sharper than what I used last time as far as composite input goes and the thin profile and smaller driver board make this much easier to work with.

The second difference is that my buyer in this case is based in the UK. This presented a problem at first because the UK and Europe use a different region code than the US. US uses NTSC for it’s format which is basically just a different hertz rating based on the electrical systems we use. NTSC is 60Hz and PAL is only 50Hz. So, this meant I had to use PAL hardware for the N64 as well as needing a few PAL games to test the system on. I also had to get a 220 to 110 transformer so he could use the battery charger that is specific to the batteries that are going in the thing. So although this one was very much the same, it had it’s share of “firsts” that I had to overcome. Fortunately they weren’t that difficult to get over.

Additional improvements also include:

– Better ventilation for the regulator and system as a whole with a new vent panel cut into the top and a vent in the back.
– Relocated headphone switch which has been moved to the face of unit instead of on the bottom where it could be accidentally pressed.
– Custom home cut PCBs for the buttons, d-pad, headphone switch and power jacks.
– PLA material for the 3D printed body and face of the casing instead ABS to prevent warping.
– Custom brackets for all loose components like the audio amp and regulator for more secure mounting and less wire stress.

So I’m pretty excited to see how this one is going to turn out and so far progress has been very quick and efficient. Time is still an issue as I don’t have much of it to dedicate, but at least when I do put the time in, it goes further. I should have most of the case parts finished off this week and then I’ll be able to start the fun part of sanding and painting and after that gets done I’ll start posting some progress pics! I’m excited to see how this one comes out!

IMAG1614_1

Alright after about 5 months of working off an on  with this project as time allowed, my first portable in a year is complete.

A commission I took at the end of last year, I was finally able to get this guy done and will be shipping out the buyer next week. This is a very basic N64 as far as portables go, but it still did have it’s issues and took a bit longer to fix than anticipated.

System Specs.

5″ TFT LCD Display
2 – 2mm Mylar Speakers
Custom Audio Amp by RDC
2 – 3.7v 5000mAh Li-Po Batteries in Series for 7.4v Output
Standard N64 Motherboard with heavy trim
Expansion Pak
Hardwired Memory Pak
Custom 3D Printed and CNC Machined Enclosure
3.5mm Headphone Jack with Manual On/Off
Dual Power Circuit for Wall and Battery Power

All in all I’m happy with this though the casing issues did irritate me to no end. But the custom audio amp (by RDC), the two seperate power circuits for wall power and battery power and the modular case style were all new techniques/items that I’ve never done before and with the next project I’ll be able to improve on the ideas and their usages.

I didn’t do up a build log for this one but I might do up a couple of posts on the modular case building technique I used as I think that could be pretty helpful for other case makers and portablizers.

So the next project is to finish off my OUYA portable that I’m about 3/4 of the way complete. That one should be fun once it’s complete. So until we meet again, enjoy the video!


The problem with the pursuit of perfection is that it over looks the steps it took to get there when based on a cumulative scale. By that I mean that a project that brings you back to your origins while showcasing the skills that have been put to use since then has a whole different sense of gratification. N64p’s are losing to both practicality and cost reasons on any selling level, but the sheer fact that they can be built just for the sake of it and still get better as time goes on is a very meaningful continuation of an old idea that was so popular just a few years ago.

Anyway, now that the philosophic portion is out of the way, I made a great deal of progress on a N64p Commission I’ve been working on for the past couple of months. With the design process complete, the time came to finally start with the assembly portion of the project. This is an old school mod all they way, but does have a few of the benefits like 3D printing and CNC machining in it’s corner to make this one of the finer designed N64 portables I’ve made.

In any case, just wanted to share a project update aside from the OUYAp V2. These simpler projects are much needed from time to time to remind me that the “hobby” aspect is what I fell in love with long ago and what keeps me going with it, even if it seems a bit obsessive sometimes.

The OUYAp V2 has started to come together. After months of design and getting the parts ready, the assembly has begun. As always, there have been some set backs and issues that did not go according to plan which has forced this to become a bit more of a hack than a professional prototype, but the changes that are made in practice are going back to correct the theory so future builds (if any) will go much smoother and make up for the short comings this version has.

But, for those who wish to be kept up to date and want a more detailed view of how the project is coming together, check out the work log over on the Unofficial OUYA Forum work in progress thread I’ve got going on. Seems to be a pretty popular topic at the moment 🙂

So I’m not going to have the time to do any more this weekend and the most complex part of the project has yet to be started. I know right, so far this has been the easy stuff. More to come soon!

Another month and another very long list of life events that need to be accounted for.

First and foremost, the most amazing thing happened to my wife and I on October 22nd. We became a parents to the cutest little baby boy around! As you might have guessed, a very large portion of my time has now been devoted to this little guy, putting modding and design on the back burner to him and my real job. Though I’m still ever persistent to get at least an hour or two of work done a day on my projects, it’s still quite the taxing endeavor sometimes. He’s actually sleeping right behind me down in my office as I write this. Sleep is hard to come by but when he konks out, I have a limited window to get stuff done which is why I’m posting now!

Evan Christopher Downing

Evan Christopher Downing

That was the big news.

The second big news is certainly modding related in that I am also a proud new owner of a FlashForge Dreamer 3D Printer which I just acquired a week ago. This completes the main trifecta of my work shop as I now have a full CAD, 3D Printing and CNC Milling capabilities in house.  This is already helping out greatly in a boat load of projects I’ve been working on and I’ve been working out the kinks to get full sized, quality prints from my new machine which I can then incorporate to the milling machine to make up for the short falls of 3D printing quality and the tolerances that have to be compensated for because of the precision of my CAD programs.

As far as the 3D printer itself goes, I’ve done a (long) unboxing video to show what one from the US might expect to find inside their package. Overall I’m happy with the machine so far, aside from some of it’s corner cutting when it comes to material and exterior construction, but hey it’s been printing reliably enough for the price and a lot of the failures I’ve had are just the early learning curve. Check out the video below if you’re so inclined to do so!

The FlashForge Dreamer 3D Printer

The FlashForge Dreamer 3D Printer

So what have I been up to these past few months? Well it’s been kind of a secret but lets just say that I’m working on trying to redefine what one could call a “hack” as far as making a portable gaming console goes. In an attempt to try and push the boundaries between what has been a traditional portable system to what I feel can be achieved, I’m getting closer to making this a physical demonstration. Since July I’ve been working on the design of a new portable project. This one is going to go where no portable has gone before and employ methods which combine all three of my in house processes along with custom PCBs and help from my good friend RDC.

IMAG1042

A test print of the front face bracket of my new project.


With all that said, the next couple of months are going to be quite fun to see where they lead. I’m pretty excited about where things are right now and there will be more updates in the near future!