Archive for the ‘Current Project’ Category

Seems these days that the time I once had plenty of for my projects have long since become a memory. With life pushing it’s way in between me and projects, I’ve been forced to scale back and make due just a few hours a weekend.

So that being said, my main priority has been the N64 commission I’ve been working on. A great deal of progress has been made and hopefully within the next couple of weeks I can have this one buttoned up. There are a few pics below that are actually about a month outdated, but they are all I have at the moment so they’ll have to do.

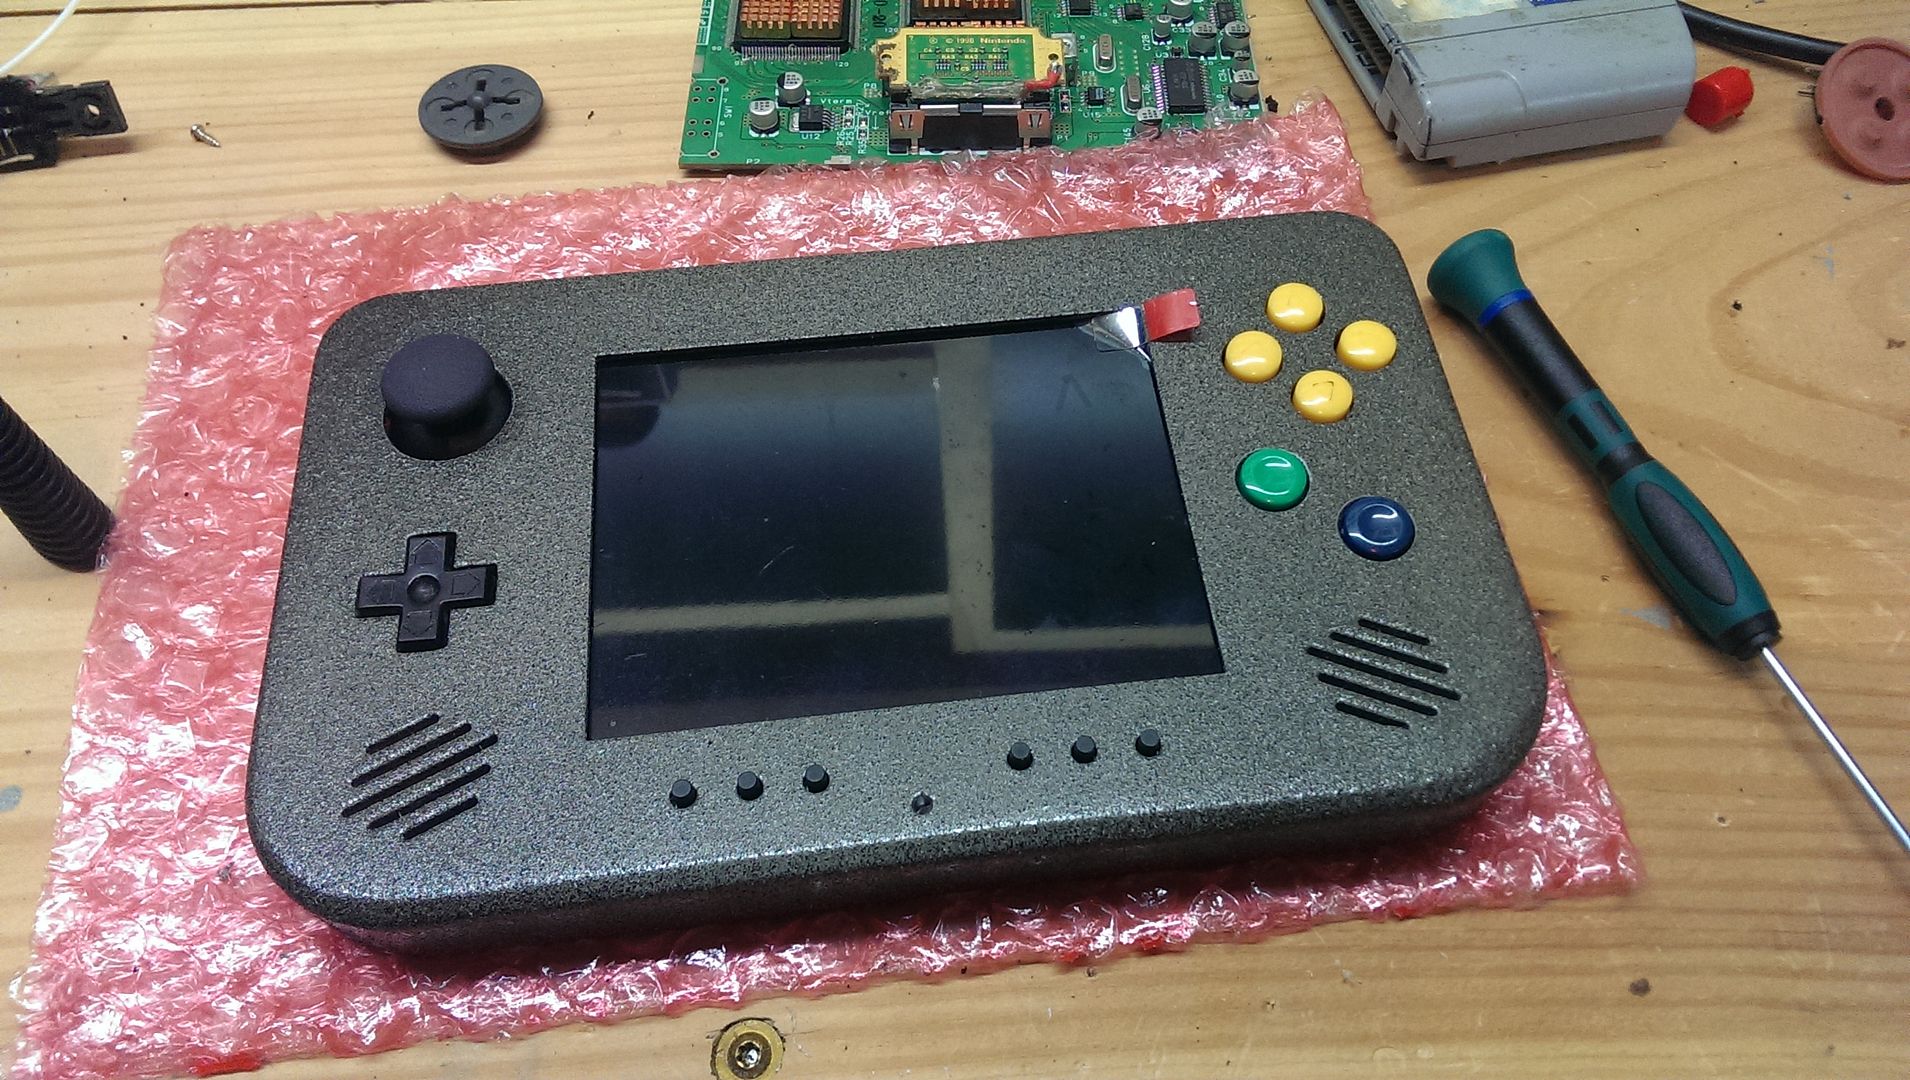
The testing phase for the motherboard as far as its functionality after being trimmed, the expansion pack, power, the cart slot and the A/V have been successfully completed. Now I just need to do some tidying up and securing the system in place for the next phase, the controller.

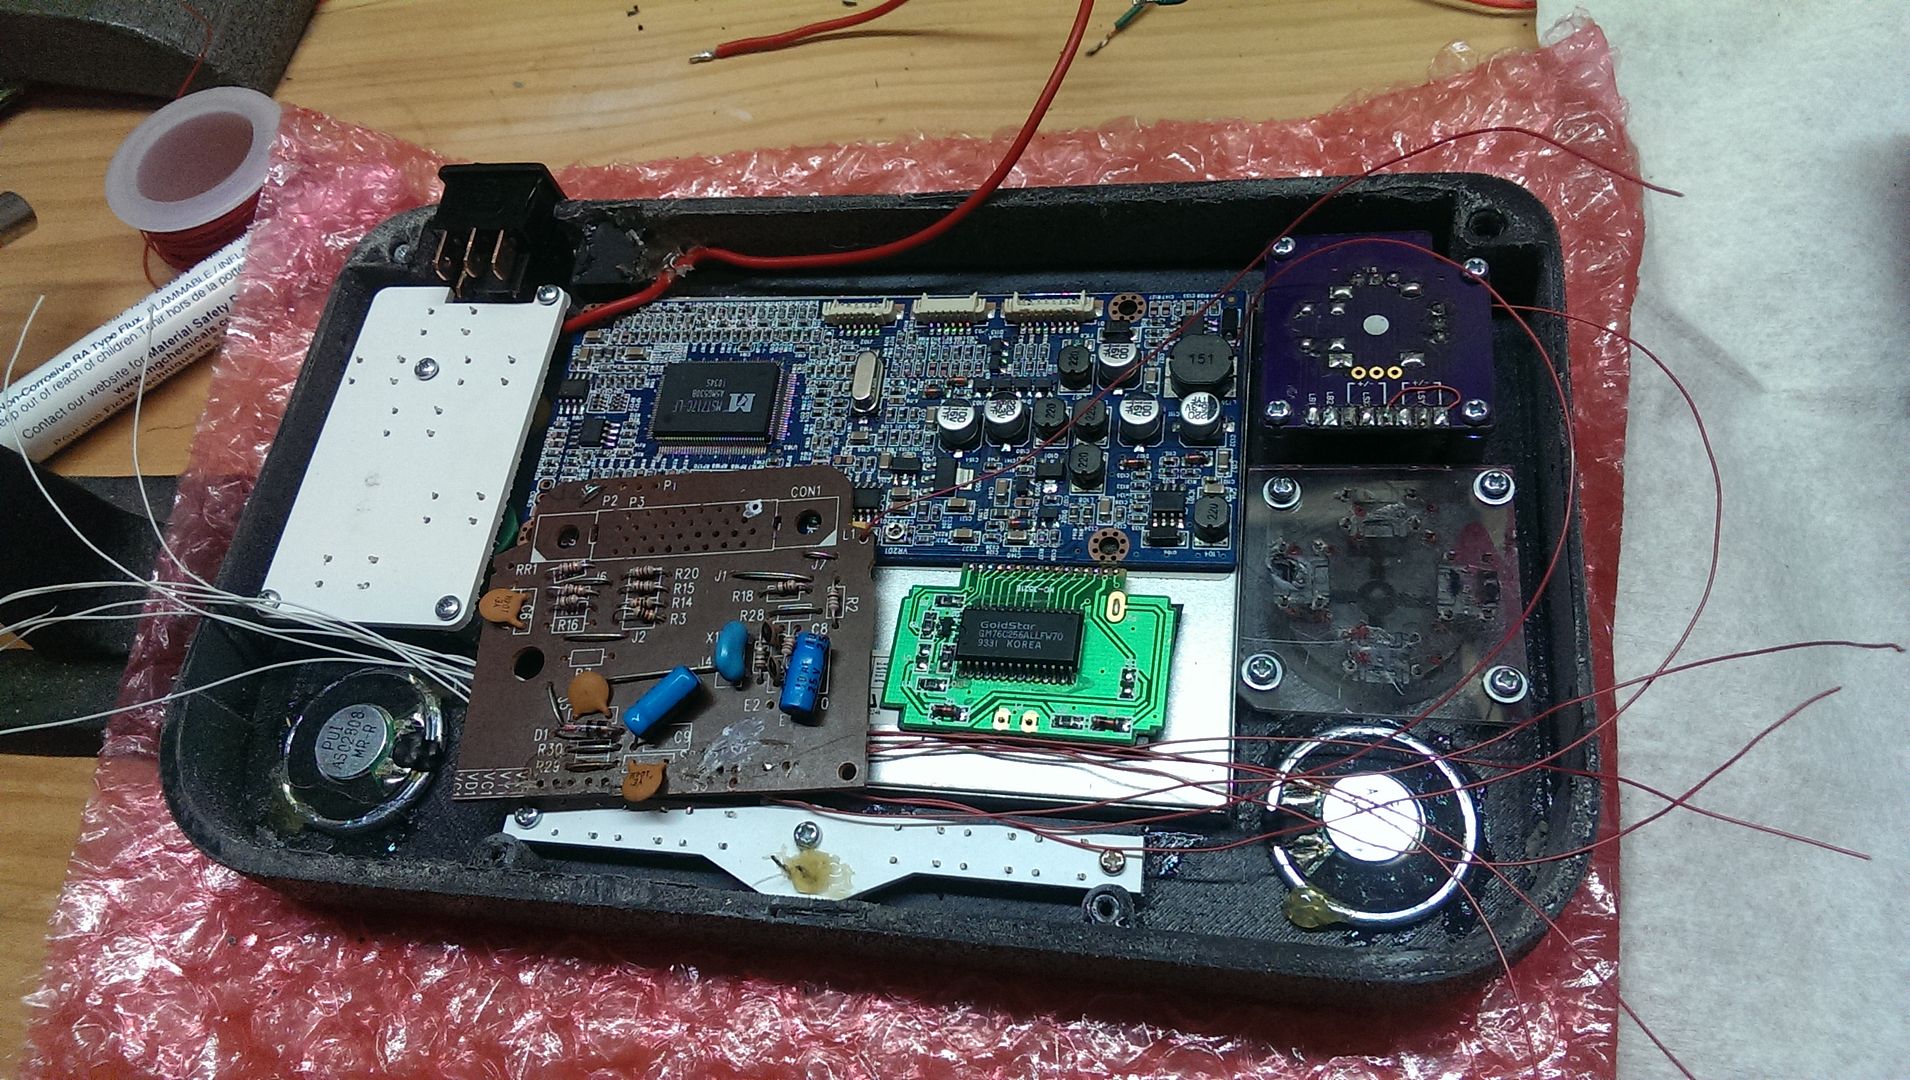
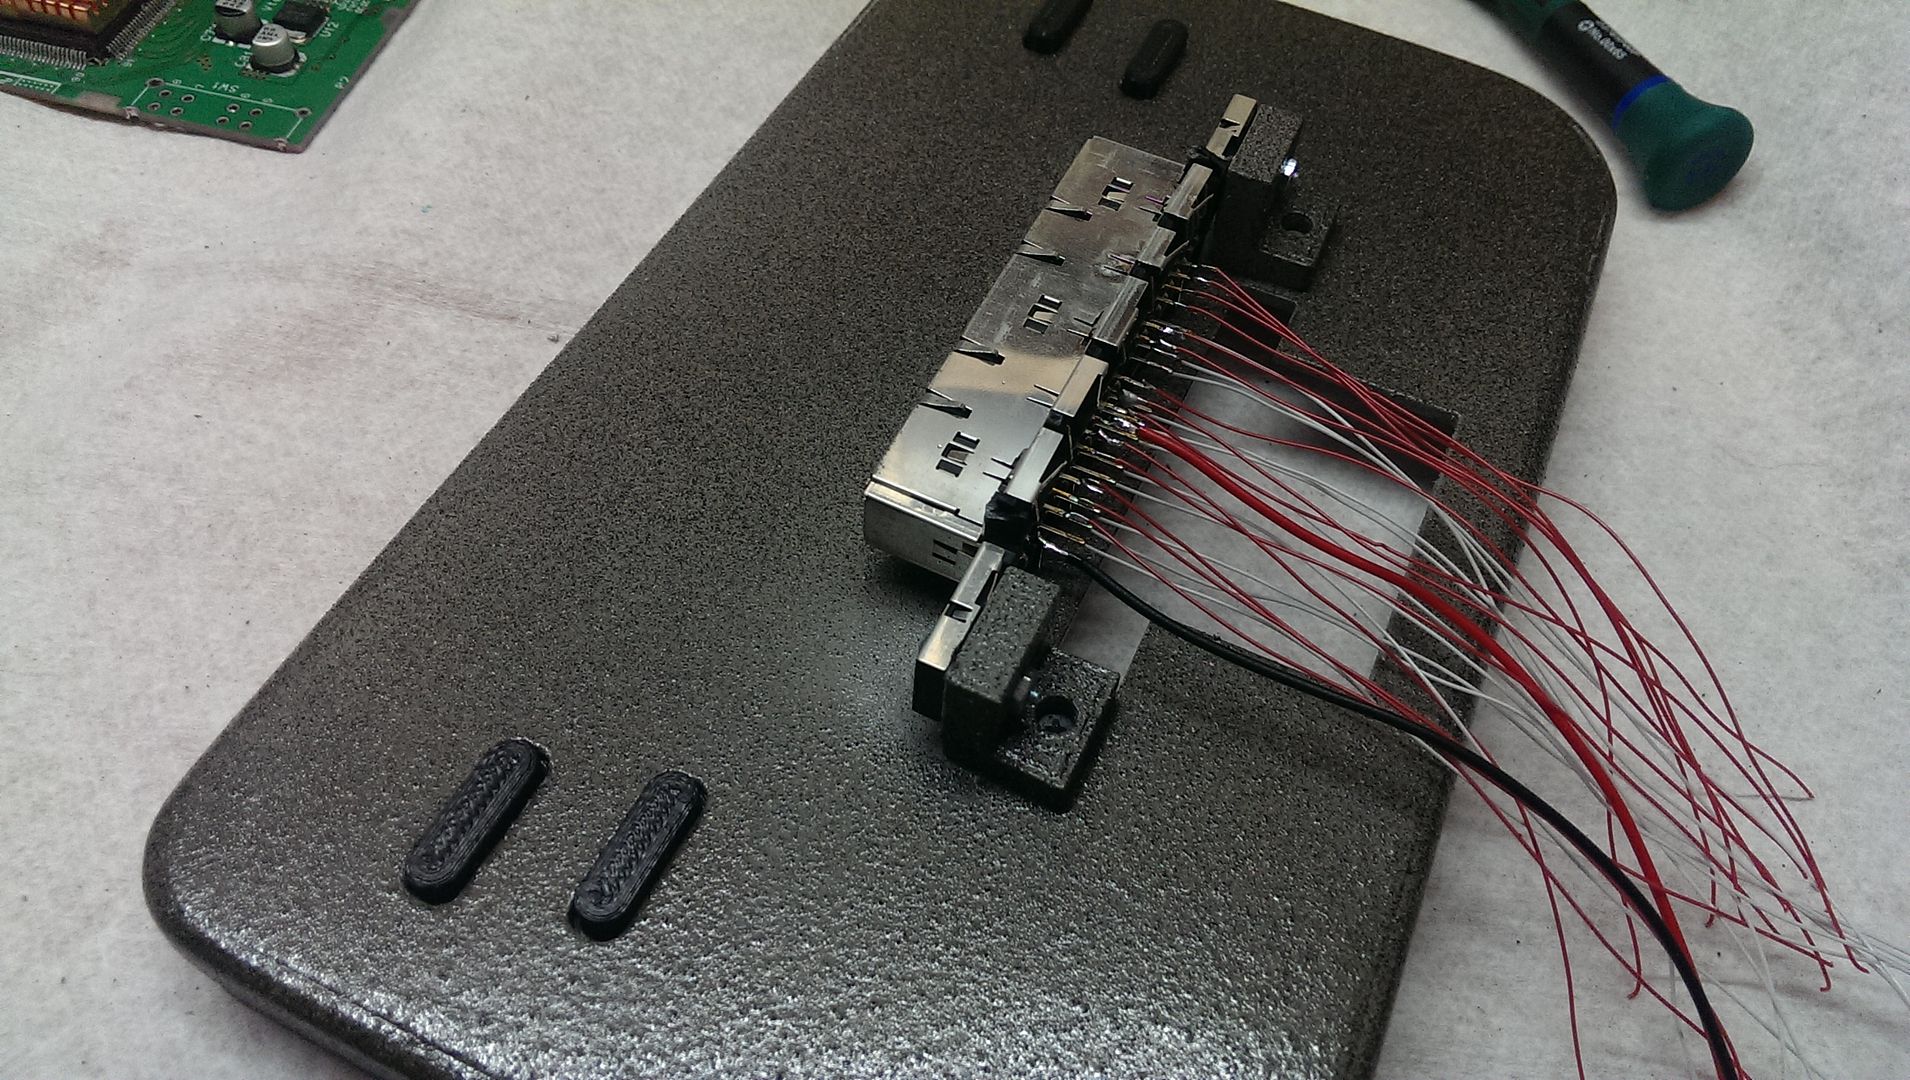
So far I’m very happy with how this is coming out and the new 3D printing techniques and part finishing is proving to work out nicely. I’m really wishing I had a resin printer for these smaller parts but one step at a time.

So my next post probably won’t be until this is complete, but if all goes well, it should be done in a couple weeks!

The problem with the pursuit of perfection is that it over looks the steps it took to get there when based on a cumulative scale. By that I mean that a project that brings you back to your origins while showcasing the skills that have been put to use since then has a whole different sense of gratification. N64p’s are losing to both practicality and cost reasons on any selling level, but the sheer fact that they can be built just for the sake of it and still get better as time goes on is a very meaningful continuation of an old idea that was so popular just a few years ago.

Anyway, now that the philosophic portion is out of the way, I made a great deal of progress on a N64p Commission I’ve been working on for the past couple of months. With the design process complete, the time came to finally start with the assembly portion of the project. This is an old school mod all they way, but does have a few of the benefits like 3D printing and CNC machining in it’s corner to make this one of the finer designed N64 portables I’ve made.

In any case, just wanted to share a project update aside from the OUYAp V2. These simpler projects are much needed from time to time to remind me that the “hobby” aspect is what I fell in love with long ago and what keeps me going with it, even if it seems a bit obsessive sometimes.

So today one of my favorite tech blogs “Hack-A-Day” posted an article of a really cool hardware gaming mod from Nolan S, otherwise know as [Fibbef]. This mod took a Sega Dreamcast and put a screen and audio speakers in the controller using a USB cable and custom break out box for the A/V…wait…that sounds surprisingly familiar.

The mod is excellent, the quality and the effort speak for themselves with this one, but the coolest part is that it’s directly related one of my older projects that did the exact same thing. The SNES-001 Advance 2 was my 2nd attempt at off TV gaming which eventually lead to the creation of the Cross Plane. The Advance used a breakout box to split the signals to the TV and the controllers so up to 3 video sources could be mirrored at once.

It’s just a really cool feeling to have that people are genuinely interested enough in some of my work to try it out for themselves, improve upon it and make it their own. I’m just excited that it’s making a bit of an impact with other modder’s that are also getting noticed for their work.

Good Job Nolan!

The OUYAp V2 has started to come together. After months of design and getting the parts ready, the assembly has begun. As always, there have been some set backs and issues that did not go according to plan which has forced this to become a bit more of a hack than a professional prototype, but the changes that are made in practice are going back to correct the theory so future builds (if any) will go much smoother and make up for the short comings this version has.

But, for those who wish to be kept up to date and want a more detailed view of how the project is coming together, check out the work log over on the Unofficial OUYA Forum work in progress thread I’ve got going on. Seems to be a pretty popular topic at the moment 🙂

So I’m not going to have the time to do any more this weekend and the most complex part of the project has yet to be started. I know right, so far this has been the easy stuff. More to come soon!

So what do I do with a bunch of extra parts and an OUYA? Well, seems how it’s been almost two years since I made an honest “portable” gaming console, I figured it was time to break that streak. With that, I’d like to introduce my half completed OUYA portable!

Yes, this looks just like the Cross Plane, much due to the fact it’s using many of the parts from the original Cross Plane prototype as well as a spare casing I had. There are a few modifications of course, more so on the back half of the casing which is being printed as we speak, but using this allowed me to use up a lot of the extra parts I had laying around, like PCBs, speakers and a ton of wires!

Clicking the picture above will take you to my build log for this where you can see it’s humble beginnings to what it’s turned into now. I’ll have more updates with this and the Cross Plane Commission in the coming weeks, so hopefully it won’t be a month in between posts!

Hey Everyone! Sorry it’s been such a long time between posts. I’ve been up to my ears in projects as well as finally getting a new job that I should hopefully start at the end of the month!

Anyway, here’s just a quick example of what I’ve been up to, still plucking away at this Cross Plane commission I took on for an enthusiastic KickStarter backer that really just had to have one of these! It’s flattering and I do appreciate the gesture, but man these things are a lot of work! hehe. Not that I’m complaining as this is by far the prettiest work I’ve done to date as I’ve been able to utilize a lot of the skills I learned about 3D printing, CNC machining, case finishing and wireless/HDMI technology. But again, this particular unit is trying to be better in every way to the prototype and in doing so, has made changes that have needed to be tested and troubleshot.

HDMI is a sensitive little bitch that will cause headaches for the simplest reasons. However, these headaches will be totally worth it once the final product is functional.

Still, have quite a bit of work to do on this, the next process being the most time consuming part, the control paks. However, RDC helped me out with these last month so we can actually utilize them the way they were intended to be used back when we did the first prototype, and not the hack job we ended up with.

In any case, I’ll try to be a bit more on top of the postings, as well as looking into maybe bringing on another writer to Downing’s Basement Blog so the down time won’t be so boring and you can have something to read more than once a month! But anyway, I’ll be making more updates soon and hope you have a happy holiday next week!